Showing posts with label hey good lookin. Show all posts

Saturday, March 10, 2012

Hey Good Lookin'! Whatcha' Got Cookin'?


Photobucket


Homemade Jalapeno Poppers


This recipe will make 32 mini poppers

What you need:

2 packages crescent rolls
1 package cream cheese
16 jalapenos
a couple strips of bacon


Clean, cut, and de-seed your jalapenos.  I cut them in half vertically first and then use a spoon to pull out the seeds.  Then I cut them horizontally so I have 4 pieces total.  I also wear rubber gloves because I always accidentally rub my eyes when doing this.  The gloves help me remember not to!


Next, roll out your crescent rolls and pull them apart.  Then cut them vertically so you get two thinner crescents.  Start at the fat end and layer one jalapeno square, cream cheese, bacon, and another jalapeno square.


Now roll 'em and place on a baking sheet!


Bake according to crescent roll directions.  The cream cheese should stay in place and not melt out.  Eat 'em warm!


*DROOL*
So delicious!


I won't be posting recipes for a while!  I'm going to wait till we're all moved in to our new place and then I'll be cooking up a storm!


Saturday, March 3, 2012

Hey Good Lookin'! Whatcha Got Cookin'?


Photobucket

No Bake Chocolate Peanut Butter Bars
Chocolate and Peanut Butter = Heaven
What you need:
2 cups peanut butter, divided
3/4 cup (1 1/2 sticks) butter, softened
2 cups powdered sugar, divided
3 cups graham cracker crumbs
2 cups (12-oz. pkg.) chocolate chips, divided


Beat 1 1/4 cups peanut butter and butter in large mixer bowl until creamy. Unless you grabbed crunchy pb like I did.  Which at this point won't make a big difference.  Crumble your grahm crackers.  I used my mini processor.  You'll see this a lot in my posts.  I seriously heart this thing!


Gradually beat in 1 cup powdered sugar. We call it 10x. With your hands or a wooden spoon, work in remaining 1 cup powdered sugar, graham cracker crumbs and 1/2 cup chocolate chips.


Press evenly into a pam-like sprayed 9x13 dish.  Make sure you press really hard and that your mixture is just a tad bit sticky.  The firmer it's pressed, the better it will come out.


MELT remaining 3/4 cup peanut butter and remaining 1 1/2 cups chocolate chips in medium, microwave safe bowl.  I go about 20 seconds then stir and continue this until it is melted smooth. This is where creamy vs crunchy makes a difference.  Had I used creamy like I was suppose to...well, you get the picture...


Spread over graham cracker crust in pan. Refrigerate for at least 1 hour or until chocolate is firm. Cut into bars. Store in covered container in refrigerator.


Next week.....home made jalapeno poppers!  SOOOO GOOOD!!

Saturday, February 18, 2012

Hey Good Lookin'! Whatcha Got Cookin'?


Photobucket


Homemade Mozzarella Sticks


(I doubled the recipe for superbowl-that is what is pictured)

1 package string cheese
1 1/2 bags Italian croutons
2 eggs, raw, beaten, with a splash of milk - in a bowl
1 cup flour in a shallow bowl
wax paper or a baking sheet


Unwrap all of your string cheese and cut in half so you have little "stubby" string cheeses. Set aside. Grind your croutons into crumbs.  I use this mini food processor.  My mom got it for me one Christmas and I LOVE it.   I find it easier to place them into a deep bowl for maximum coverage but if you prefer a shallow one , more power to you.


Set up an assembly line, flour, egg, crouton crumbs, wax paper/baking sheet

See the "stubby" string cheeses?

Starting with the flour coat your cheese "stubbs" one or two at a time. Then coat in egg mixture and finally croutons.  Place on your wax paper/baking sheet.


Now repeat the process WITHOUT the flour!  Coat in eggs and then croutons.

See the difference?  Left- one coat.  Right-two coats

For best results let them chill in the fridge until you're ready to cook.  For a quicker chill, place in the freezer for an hour.

There were three layers in this container!  They didn't last long!

  WARNING!  The first time I made these I left them in the freezer for a few hours.  When I tried cooking them the outsides cooked but the inside didn't!  So if you forget and leave them in the freezer let them thaw a bit on the counter before cooking!!

Fry in cooking oil at 375 (F) for a minute or two.  The outside will have a nice brown color when done.


So melty and delicious!


Come back next week for no bake chocolate peanut butter bars!


Saturday, February 11, 2012

Hey Good Lookin'! Whatcha Got Cookin'?


Photobucket


Potato Salad Bites


They were so yummy!

12 red potatoes, cleaned
mustard
mayo
dill relish
1/4 onion, diced
2 hard boiled eggs, peeled, chopped
salt & pepper
cooking oil
2ish radishes, sliced-for garnish


Give your potatoes a rub down with some cooking oil and place them on a cookie sheet.  Bake at 375 (Fahrenheit) for about 20 ish minutes.  You want them done in the middle.  Take out of oven and let cool.


I made these for Bunko-that's why there's more than 12

Slice a small piece off of each end and then cut in half.  You want each half to be able to "stand up" on the cookie sheet and not wobble like weebles.


See how the ones on the bottom left stand up and don't wobble like the others?
Take a small melon baller- I used a rounded teaspoon- and dig out the middles of the potatoes.  Leave about a quarter inch of flesh around the skin.


Run a knife through your pile of potato insides to chop them up a bit and then place them into a medium size bowl.


This is the part where you make the actual potato salad.  If you have a special family recipe then by all means use it!  This part is completely to taste!

Add about 2 spoons of mayo, one of mustard and relish, your hard boiled eggs and your diced onion.  Salt and pepper to taste.  Mix until all potato pieces a covered with wet ingredients.


One by one, scoop potato salad into potato skins. Add a slice or two of radish for garnish.


Chill and serve.  No plates or silverware needed!!
YUM!


Come back next week for homemade mozzarella sticks! 

Sunday, February 5, 2012

Hey, Good Lookin'! Whatcha got cookin'?

I have decided to start turning Saturday into "Hey Good Lookin', Whatcha' Got Cookin'" Saturday.  If I can ever figure out how to work those darned buttons (grr) I might even make a button for it! 


Photobucket


Clean Kitchen Breakfast Burritos
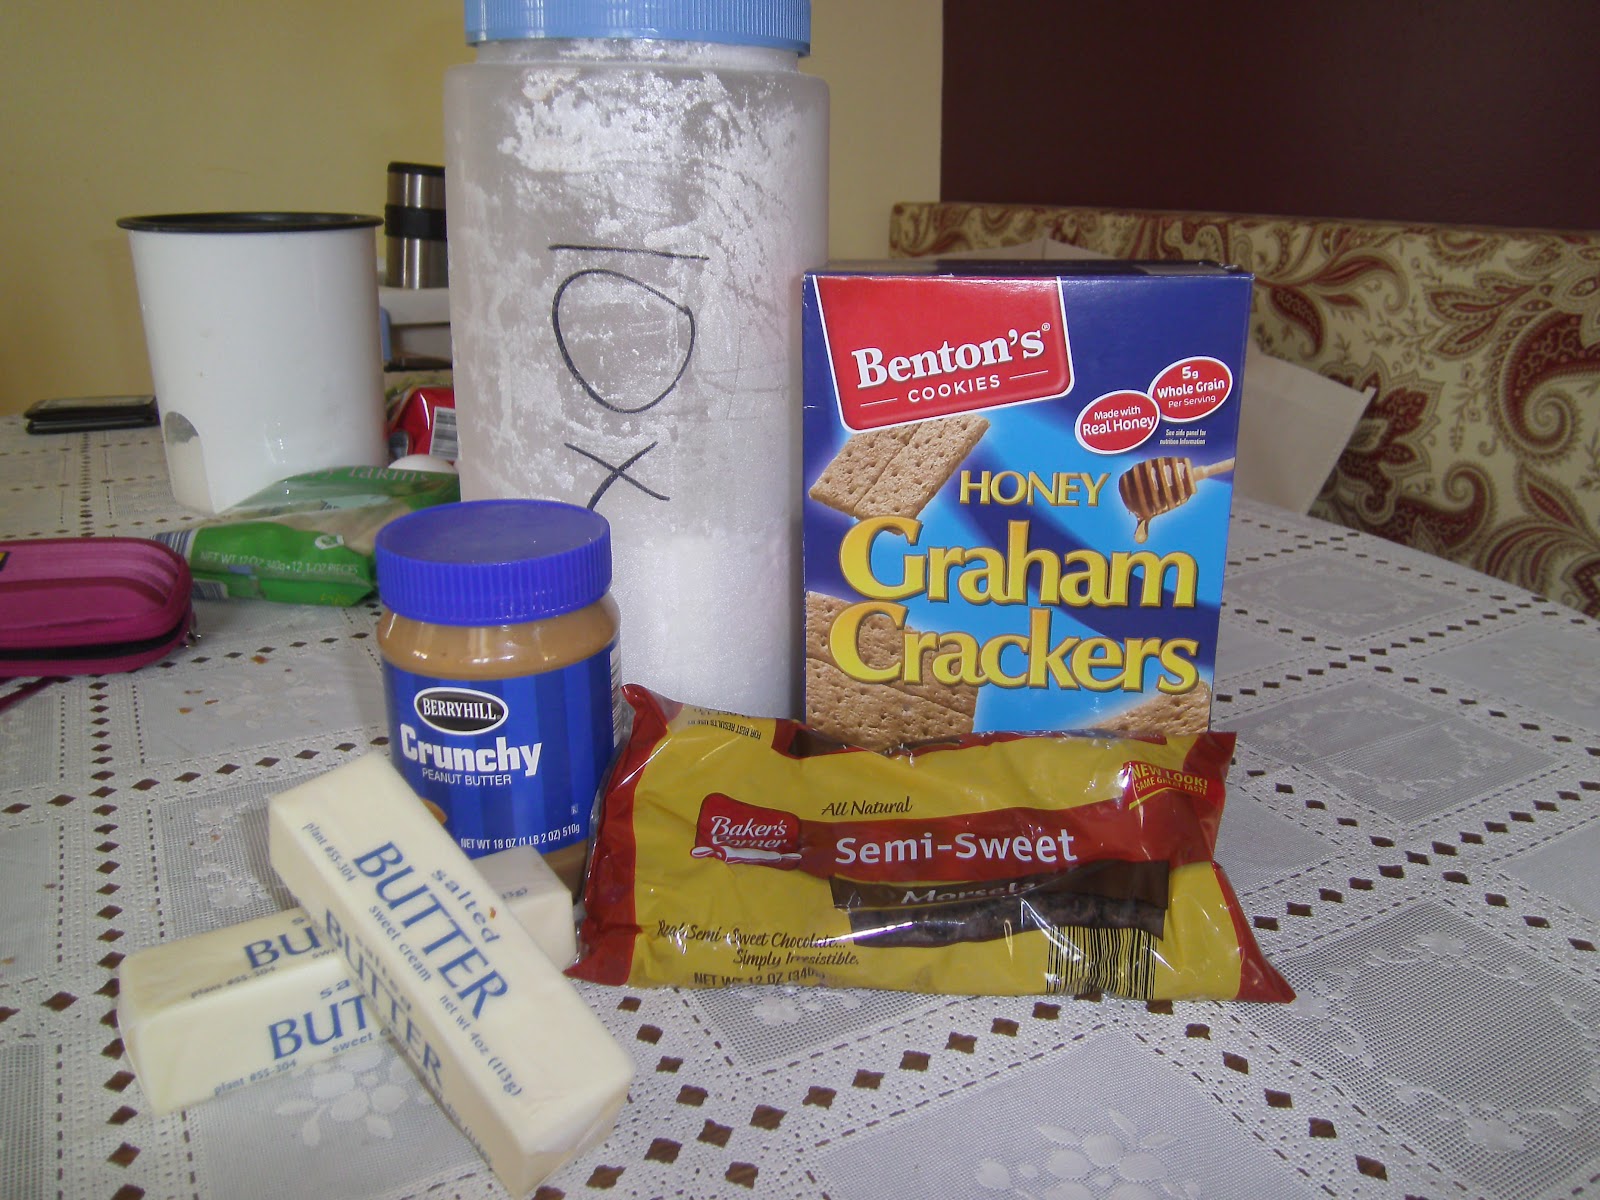
 You will need:

1 lb ground breakfast sausage
1 lb bacon, strips/ends and pieces-it's all good!
1/2 medium onion, diced
4 medium potatoes, cleaned, slightly cooked (micowaved about 3 mintues) and diced
8 eggs
20ish small flour tortillas
16 oz. shredded cheddar cheese
a few spoons of flour
milk
2-3 tbs. butter
cooking oil - I like canola 
pepper
salt

Let's get started!

Pour a little canola oil into your fry pan and let it warm up.  Add your diced onions and let them cook a minute then add your potatoes. Salt and pepper to taste.


Let the potatoes cook for approx. 5 minutes on medium/high heat. You want them to get nice and crispy. Use a spatula and flip them over to cook the other side. When they are to the cripsyness of your liking, drain on a paper towel.

Meanwhile, slice your bacon into small pieces.  This is easily done when it's still frozen.  Cook to preferred doneness.  My breakfast sausage was already cooked so I threw it in with the bacon to warm it up.  Otherwise you would just cook up your sausage after/before your bacon.  I let both drain on a paper towel.


Crack your eggs in a bowl and whip them with a fork/whisk. Pour them into a lightly buttered/sprayed pan and cook till they are slightly runny.  


Turn off the heat and add your potatoes, bacon and sausage. Depending on your pan size you may need to mix them in a large bowl. 


Lay out your tortillas on the counter. 


Place a small about of shredded cheese on each tortilla followed by about 2 spoonfuls of egg/meat/potato mixture. 


(This next part is optional.  Hubby and I like it because it gives more flavor to the burritos and it gives a nice balance to all the dry ingredients. You could also use a white gravy packet instead of making it yourself.)

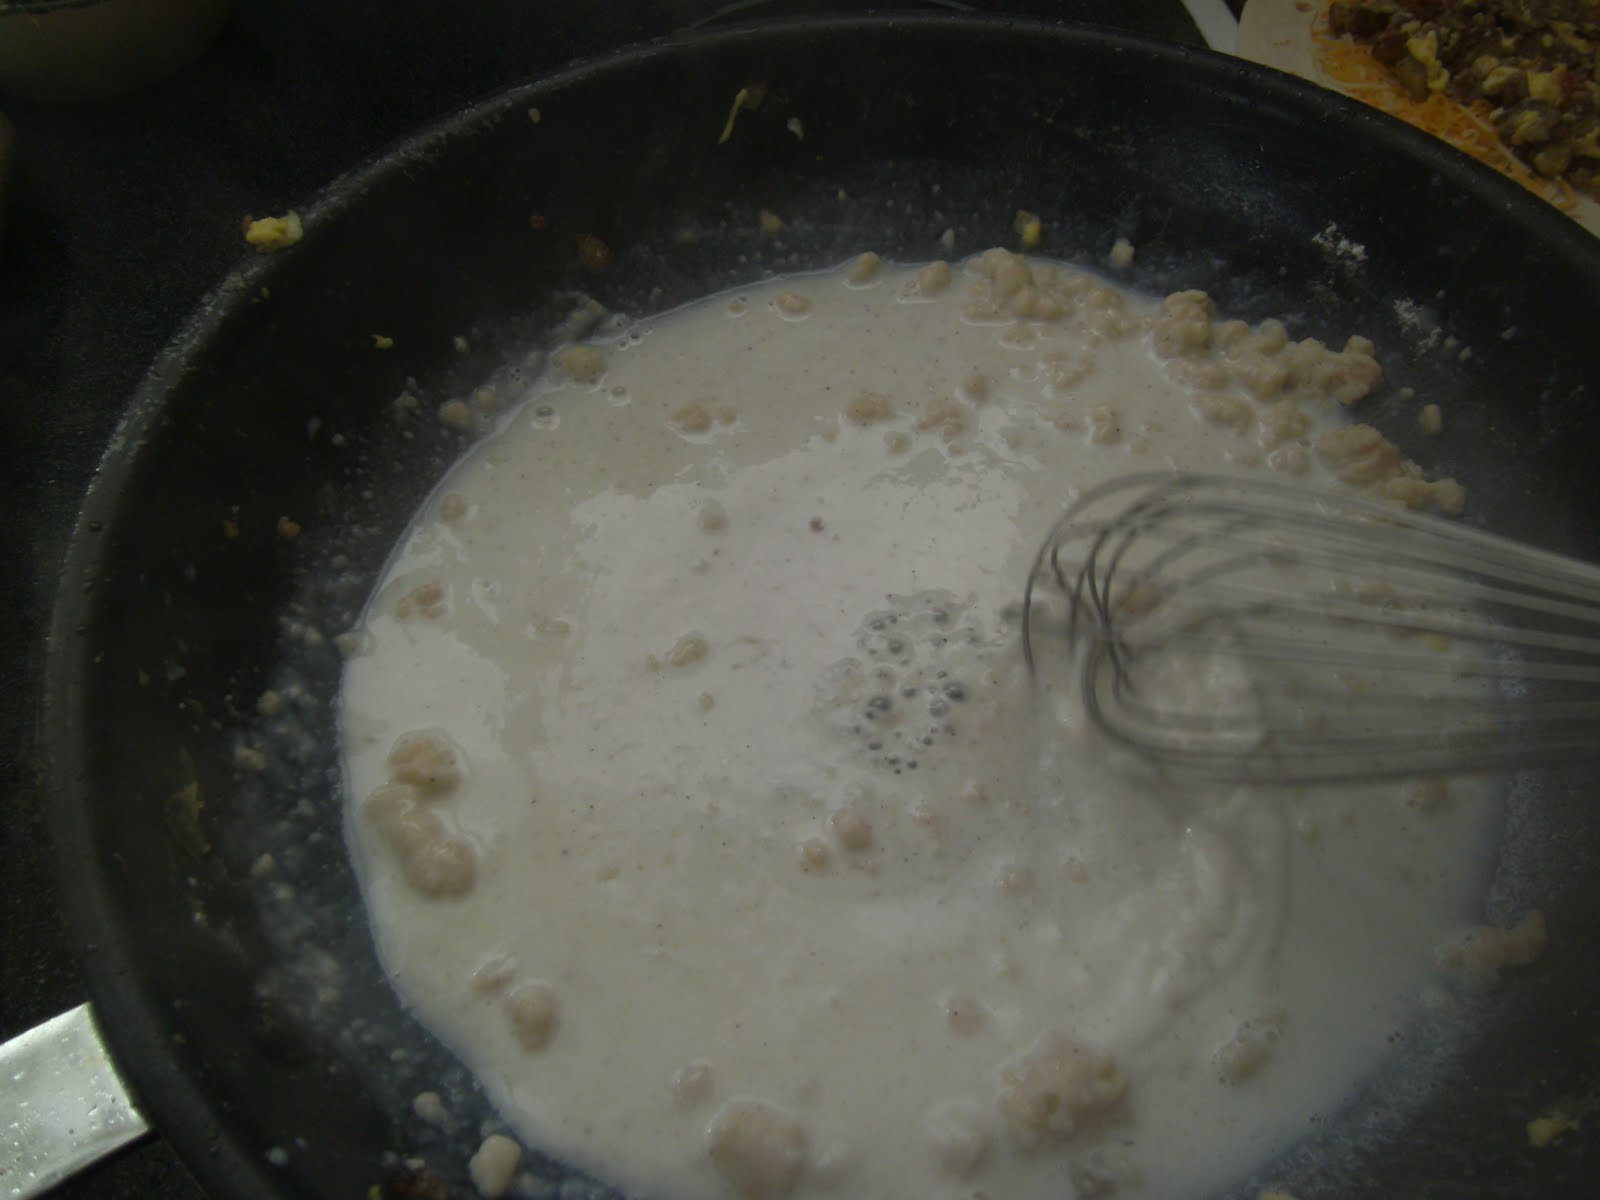
Melt about 2 tbs of butter in your pan.  Add about 2 tbs of flour and whisk together.  It will become thick and clump-like.  Add a couple shakes of pepper, too.   Pour about a cup of milk and start whisking.  If it feels really think, add a little more milk.  Keep doing this till you get a nice smooth, white gravy.  I turn the heat off after the first cup of milk.


Spoon gravy over each burrito. Just enough to sort of "wet" the ingredients but not so much that it's spilling off of each tortilla. Then fold each burrito and place seam side down on baking sheet. I left the ends of mine open because I filled them a little too much! 


Bake Time/Temperature: This is where the clean kitchen part comes in! Your bake temperature/time depends on how clean/messy your kitchen is. If you just need to put a few things into the dishwasher and wipe down your counter tops then cook at 400 degrees Farenheit for about 8-10 minutes. If you need to unload the dishwasher, reload it, wipe your counters and the floor could use a good sweeping then you'll probably want to knock the temperature down to about 365-375 for about 20 minutes. 


Yummy! Enjoy breakfast..or in our case a late brunch...in your clean kitchen!


That's it for my first "Hey Good Lookin'!  Whatcha Got Cookin'?" post.  See you next Saturday for Potato Salad Bites!

Tuesday, January 24, 2012

Blogging it up like Barney Stinson

I have come to the conclusion that I enjoy blogging. I find myself saything the phrase "I can put that in my blog" quite often. Hello Barney Stinson! HAHA! So I was thinking that I'm going to start making a Saturday post called Hey Good Lookin'! Whatcha Got Cookin'? Perhaps maybe make a button for it? Do a linky party?  Both?  Not sure, yet. Time will tell. I love to cook and show off what I've made and I think dedicating a specific day to that would be fun. Also, I think I'm going to start doing a Skincare/Make-Up Tip of the Week in my sidebar. I was the Manager of Estee Lauder while we lived in Louisiana and I learned so many interesting things while working there. I found that most women think that skincare routines/makeup application is much more difficult that what it really is. Plus, I love to share my knowledge! I'll share this first week's tip here but I think that I'll just change them each week without a post.

  Here is this week's tip!


Always, always, wear a moisturizer under your make-up. It will actually change the color and texture of your foundation! Don't believe me? Try this: rub a dab of moisturizer on the top of your left hand. Now, take a cotton ball and rub it in your face powder and then rub it on the back of your mositurized left hand AND your un-moisturized right hand. See the difference?


Don't forget to start checking my sidebar every week for a new skincare or make-up tip!